![How To Start a Blog Today [Quick & Easy]](https://www.richsumo.com/wp-content/uploads/2019/01/lin-mei-159435-unsplash-1-1080x675.jpg)
How To Start a Blog Today [Quick & Easy]
Push Through the Blog Process
Today I’m going to show you exactly how to start a blog from scratch.
In fact, this is the same process that’s helped me get this site & many others off the ground.

I should also point something out:
This is a non-technical introduction.
That is to say, if you’re just getting started you’ll love the simple steps in this guide.
5 Fundamental Sumo Movements for Starting a Blog
Trust the Sumo; Push, Thrust, Force, Throw & Lift yourself to get through the steps below and you’ll be the proud owner of a new blog.
If you truly want to earn passive income then take the time to complete each of the steps outlined in the table of contents below.
Table of Contents
- Choose Your Blogging Platform
- Designate a host for your blog.
- Decide on a domain name.
- Set up WordPress (the easy way)
- Choose and customize a design.
STEP 1: Choose Your Blogging Platform
If you want to build a good, mobile friendly and functional website quickly, you’ll need to choose a platform (also known as content management system).
Since you’re new here I recommend immediately removing all of the paid options.
Now let’s look at the free ones and see whats the best fit for you.
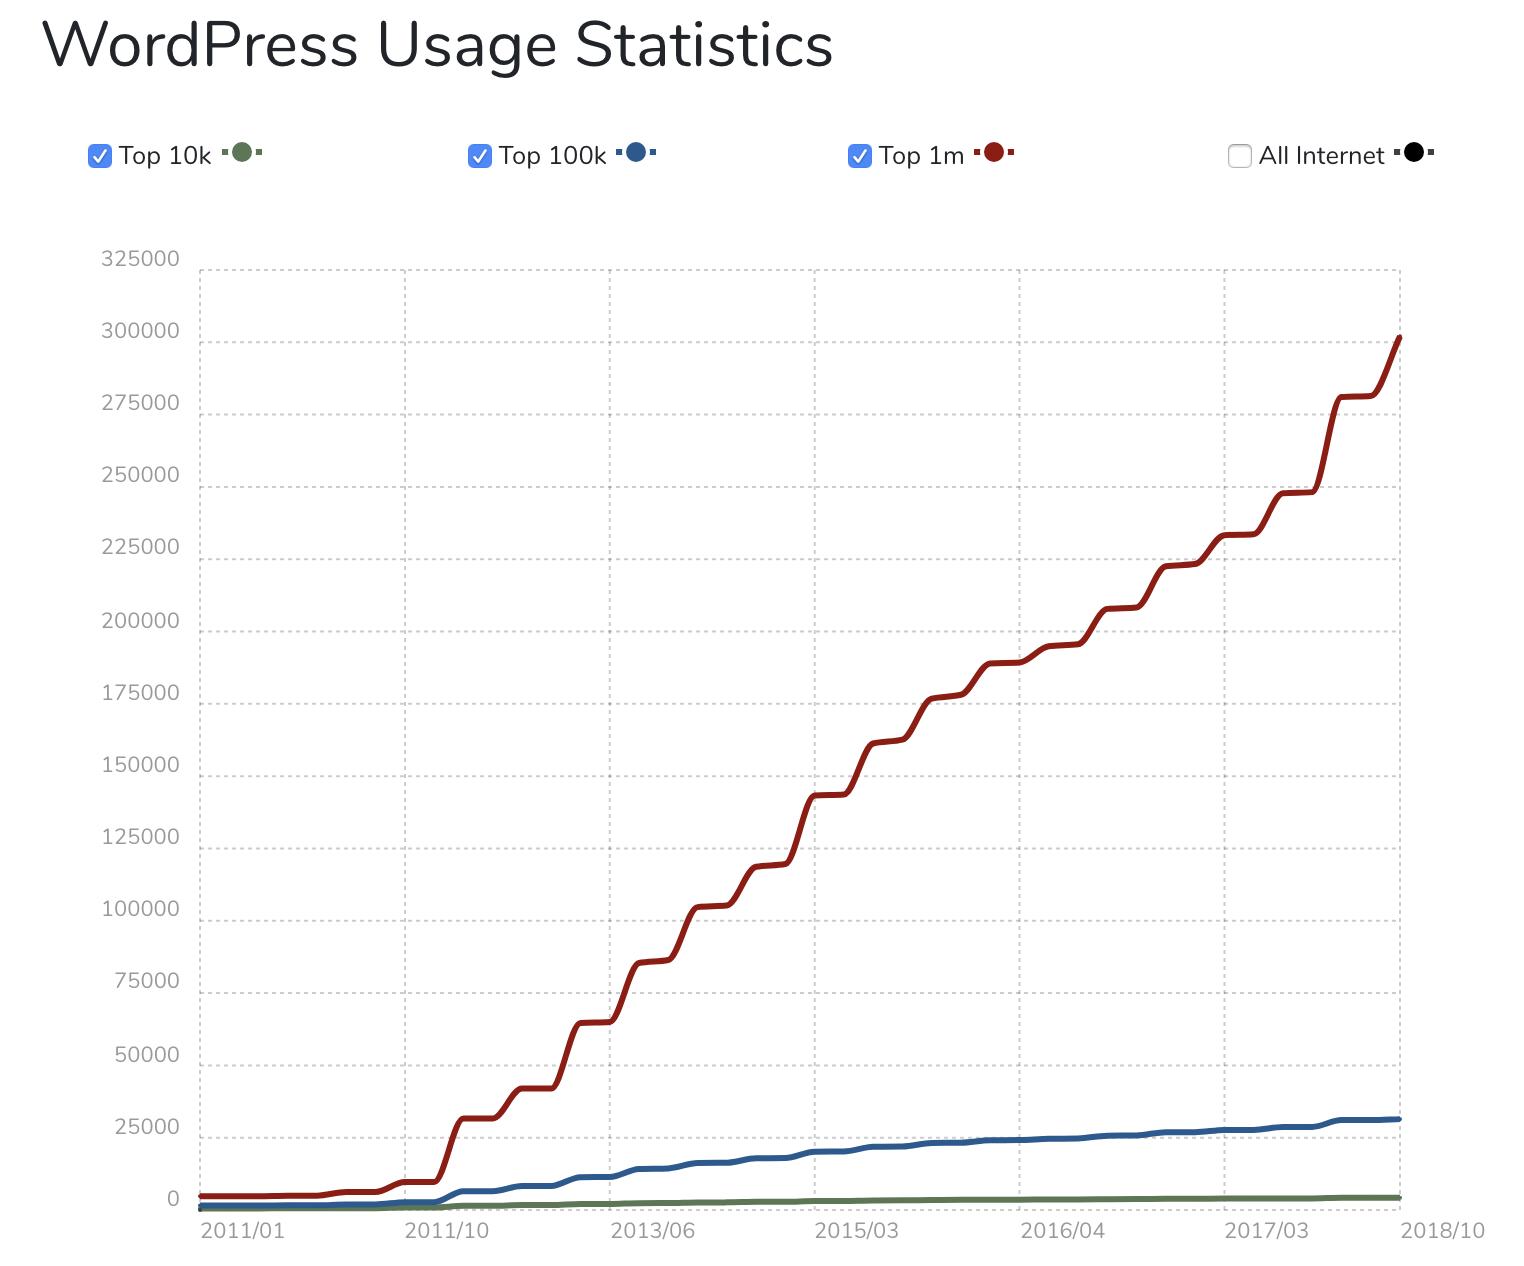
The most popular CMS (by far) is WordPress.
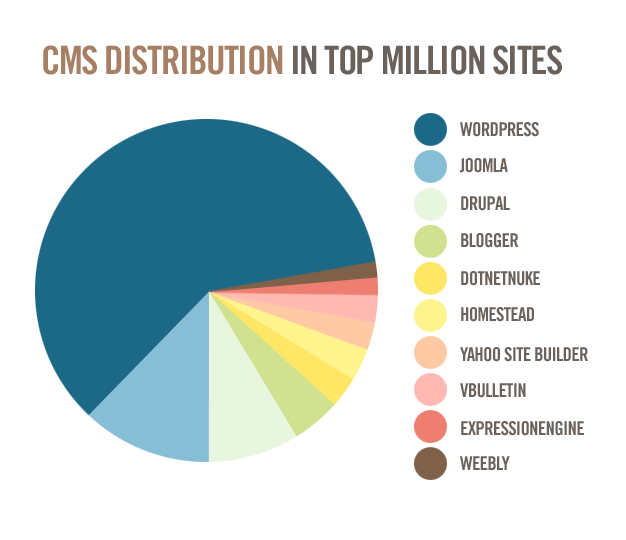
Here’s Why Most People Use WordPress to Build a Website
Already you’re thinking man… there’s so many differences across all the different platforms I’ll never even get past step 1.
I get it and I’ll save you the hassle. Choose WordPress simply because it’s a free open source content management system that’s geared towards bloggers.
For example, WordPress has an enormous user group with great support, the easiest to use interface, minimal server requirements, countless free (or paid) themes to get started and it is SEO optimized.
If you don’t know what that last one means, you will soon enough.
In short, just know that WordPress is the best for you today for that reason alone. If you want get blogging right away and become profitable right away you’re going to have to dismiss the complexities of the other CMS offerings intended for experienced users and/or ecommerce.
You’re 20% closer to learning how to make money blogging. So get excited about WordPress and move on to the next step.
STEP 2: Choose Website Host
Now that you’ve decided on WordPress (wink, wink), you’re going to need a couple more things.
- Hosting (a service that connects your site to the internet)
- A sexy domain name (hopefully seo friendly) like richsumo.com
I’m sorry to say that this one step that costs a few dollars. Domain name and hosting varies quite a bit but know that you can run a successful business for as little as $5/month.
I understand that there a lot of free platforms where you can set up and host a site for free but please be aware, they’re free for a reason.
Above all, you won’t be able to control multiple aspects of the site, most importantly the domain name.
Moreover, you’ll be sharing a server with all the other ‘free’ sites.
I’m all about being frugal and only spending money where it is imperative and a WordPress centric web host is absolutely essential.
What makes one host better than the next?
There’s countless reviews, one of which can be found here but essentially it comes down to what you are trying to achieve.
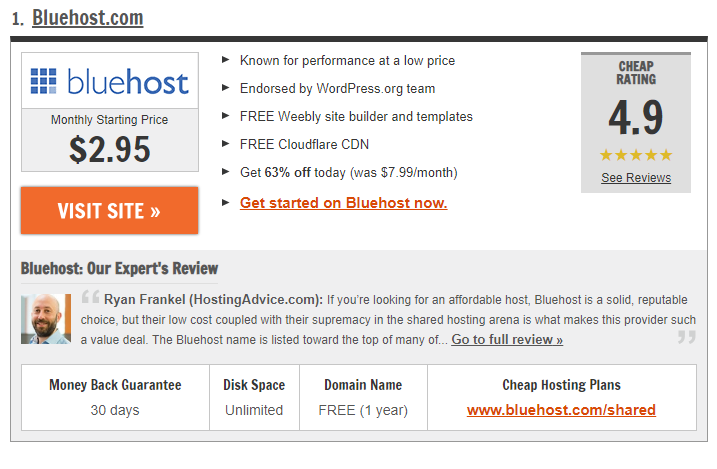
You are trying to make money blogging correct? Then Bluehost is the optimum choice from my perspective.
I use Bluehost, that’s why I endorse Bluehost. An obvious benefit is that they’re geared towards hosting WordPress sites a hosted cloud solution.
In addition, they have a one click installation for WordPress.
Further, Bluehost allows for unlimited domains and they give you a free domain name.
Above all, they’re customer service is excellent. I’d recommend using the chat option for all things technical and give them a call when you want answers to account related questions.
Most importantly, it’s super easy to take action and get started.
Start Here
Action Step 1: Go to Bluehost.com (or another host)
Remember: Since I’m using Bluehost myself, I’ve mediated a friendly discount for RichSumo.com visitors. Use this link to activate it.
You’ll get:
- 50% discount
- Free Domain Name
- Free SSL Certificate
- 1 Click WordPress Installations
- 24/7 Support
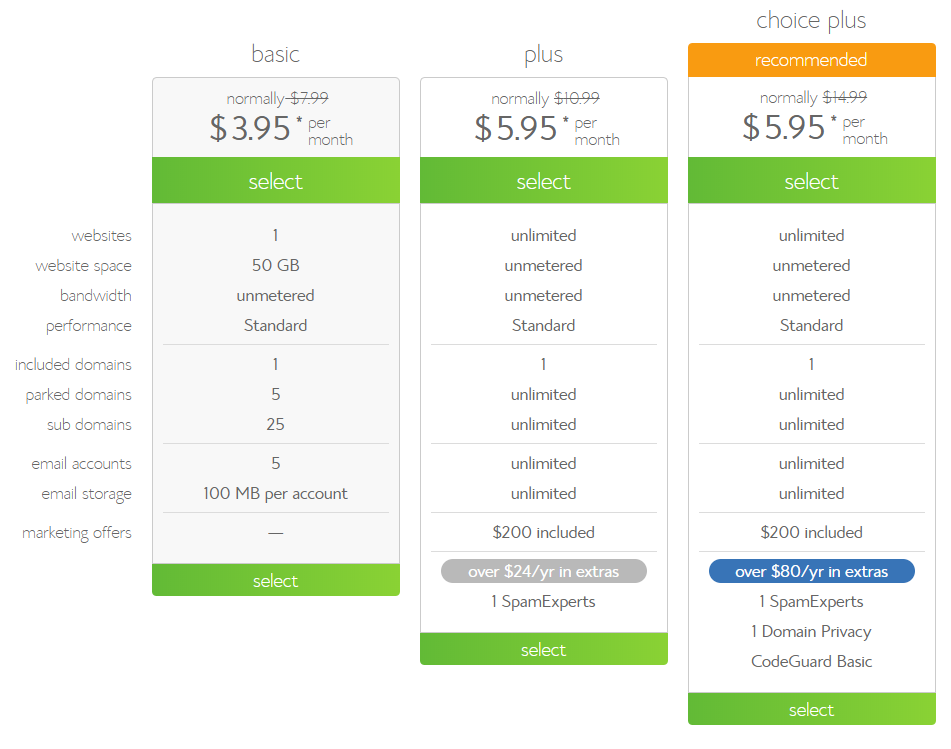
Action Step 2: Choose A Hosting Plan
After you click to get started now you’ll be taken to a page to select the hosting plan of your choosing.
- Basic
- Plus
- Choice Plus
- PRO
If you are on a budget, you can choose their basic plan. It’s great for smaller sites with low or no traffic
However if you want to scale or expect more traffic to your website, I recommend choosing their choice plus plan. Its truly unlimited.
Whichever your choose, you can upgrade or downgrade later depending on you needs.

Action Step 3: Choose Domain Name
If you already certain of your new domain name then by all means confirm it’s availability with Bluehost!
If not, I recommend you skip this step for now since you can always come back to it later.
We’re also going to go over strategies for selecting a domain name in depth in section 3!

Action Step 4: Create Account
Just enter in your personal information on the “create your account” page or use the ‘Google Sign On’ if you already have an existing google account.
All you’re going to need is to add in your vitals in order to get the ball rolling.

Action Step 5: Select a Package
Simply choose the length of your web hosting registration and you’re good to go. The longer the plan, the better the rate.
Choose a password and you are well on your way to building online wealth by virtue of your own blog.
STEP 3: Pick an SEO Friendly Domain Name
It’s important to take the time to get this step right.
Try your best to incorporate the business name into the domain. For example: CompanyName.com
If you plan on using your site to make money (which is why you’re here) then it’s vital to pick a domain name that is as SEO friendly as possible.
Let’s try this:
Go to namemesh.com and play around with the featured products or services you plan on using on your website:
So if your site is about “Ugly Sweaters” add those 2 words to the search field with a space in between.

Immediately you’ll see that most likely your choice of domain name has already been taken but don’t fret!
Recently a huge amount of domain suffixes (the end part of the web address, like .com) have come out, ranging from .green to .shop.
Important Note! Since this is you first venture into the online world avoid new or unknown extensions and go with .com, .net or .org unless they perfectly capture your business name (i.e. uglysweaters.net).
Even then, I recommend scrolling to the SEO results and selecting a domain name that is a slight variant of your desired name but still has a .com suffix. (SEO – Search Engine Optimization – is going to be vital going forward)
Since uglysweaters.com is already taken you may want to try something from the list below.

The point is to have an ‘exact match’ of your business name inside of your domain if you want to compete for organic traffic.
So justuglysweaters.com is going to better positioned to attract targeted traffic rather than using a different suffix (uglysweaters.green) or a modified title (ugsweats.com).
No matter how common your topic may be there’s plenty of names still available.
Seems simple enough but choose wisely, to learn more check out the benefits of getting the right domain name.
Every dime that I earn starts with my online presence. I’ve put together a free 9 step money making model for you that goes through each step that I use personally to build online wealth.
STEP 4: Website Setup (Quick & Easy)
You’ve already gotten past the biggest hurdle; the one that requires your credit card. Now it’s time to have some fun!
Let’s get your website up and running. The first step is to install WordPress on your domain.
Installing WordPress
There are a couple different ways to install WordPress since you are using Bluehost, this is going to be the easiest step you’ve done so far.
1. TO CREATE A WEBSITE WITH WORDPRESS USE the BLUEHOSTS ONE-CLICK INSTALLATION:
After your singed on with your new web host I recommend exploring the menus and start getting excited about all that’s included in your new membership.
One of the best parts about partnering with Bluehost is that they’ll handle installing WordPress for you with simple click of the button.
Here are the steps you should follow (should be similar across the major web hosting companies).
Installation Steps
- Log in to your hosting account.
- Find WordPress Tools in the top menu
- Select the New Install option.
- Choose the domain where you want to install your website.
- Choose a username, password & email address (can be changed later)
- Click ‘Install’
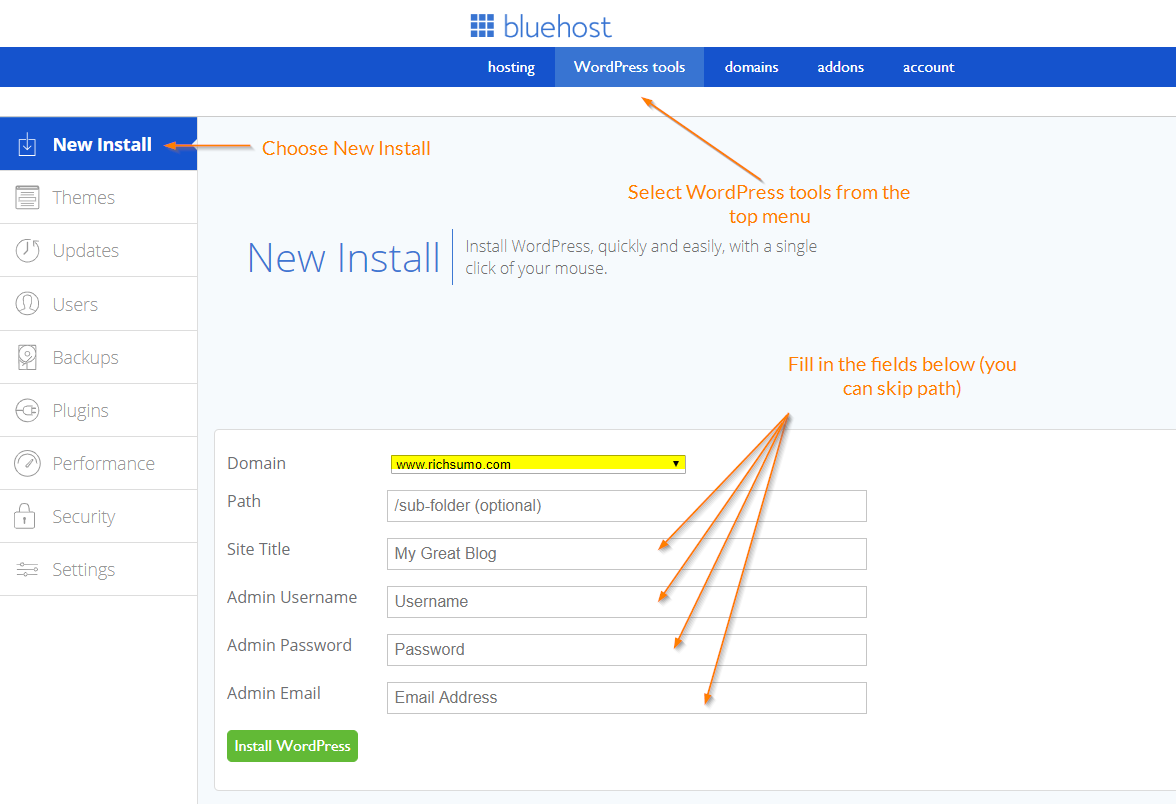
Or click the ‘Help’ menu and Bluehost will walk you through the installation as well: How to Install WordPress on Bluehost.
2. IF YOU”RE FEELING BRAVE AND WANT TO TRY MANUALLY (For those who don’t have a 1 click option)
It’s most likely that whoever your host is these days will take care of this step for you with a simple click of the button but if you are feeling confident at want to take a stab at it the guys a wpbeginner do a nice job explaining the steps.

STEP 5: Choose Theme / Create Content
Wow, almost there! Now it’s the fun stuff, choosing a design template that complements what your site is all about. In WordPress they’re called ‘themes’.
You can change your ‘theme’ any time and I recommend that you give a few different ‘themes’ a test run before settling on a favorite.
Be Warned! There’s so many options you could spend hours and hours exploring. Try a search for ‘best free WordPress themes 2019’.
I use Divi: Yes, it’s a paid theme, but it has truly transformed the way I build websites on a daily basis. I’ll just say it’s constantly being updated and there’s ‘lifetime’ support. There’s really nothing like it, but that’s another post 😉
To install a theme
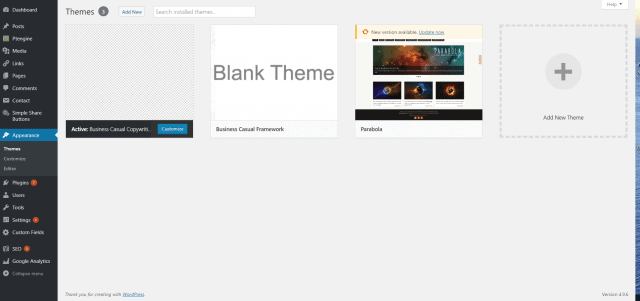
Simply click “Add New Theme” to get started. Don’t get ahead of yourself. Don’t get caught up in all the settings in the dashboard. Just pick a theme and hit ‘Activate’.
You DID IT!!!! Time to take a step back and pat yourself on the back. Remember like I said at the top it is going.
There’s lots more to come….
But for now, all comments and ideas are welcome.
Please Share
Pin This